The title above now has a twofold meaning: Initially it referred only to a simple bit of lagging in our domestic hot water system; but considering that a couple of months have passed since (during a cold snap in early February) I started writing this, it now also refers to my slow response in finishing off some basic analysis of the effectiveness of conserving heat. Perhaps this also offers a clue as to why more wholesale domestic energy efficiency improvements aren’t moving at any real pace.
With much discussion recently around decarbonisation of heating – including the comparison of heat pumps vs. gas boilers and the like, it has become clear that improving energy efficiency / heat losses of existing systems is a really important precursor to making any changes to heating technology or fuels etc – but can come at a cost. In the depths of winter it got me thinking (for the first time, I must admit) about our own system at home – and where the main losses / quick wins are.
It felt as though starting off with getting the draughty suspended timber flooring insulated would be a good starting point – but in the process noticed that a lot of the central heating copper tubing under the floor were bare (not insulated). Criminal!
So with a freezing cold snap on the way, that weekend I got under the floor and fitted some basic lagging to the heating tubing.
Olwg Unit Converter App
A Practical Project
This is a really low-cost, easy practical project that requires no skill; just a bit of spare time to think about & do these kinds of things (thanks COVID!), a willingness to crawl into tight dusty spaces for the sake of scientific endeavour, and the price of a round or two in the pub.
- Equipment Needed: Knife (to cut lagging to length); cool safety glasses with built-in LEDs
- Materials Cost: £1.18 per metre for lagging to fit 15mm tube
(or £1.38 per metre for lagging to fit 22mm tube) - Project Management: Click n Collect from B&Q Chiswick (assume zero cost!)
- Total Project Cost: 20m x 15mm tube lagging + 2m x 22mm tube lagging = £26.36.
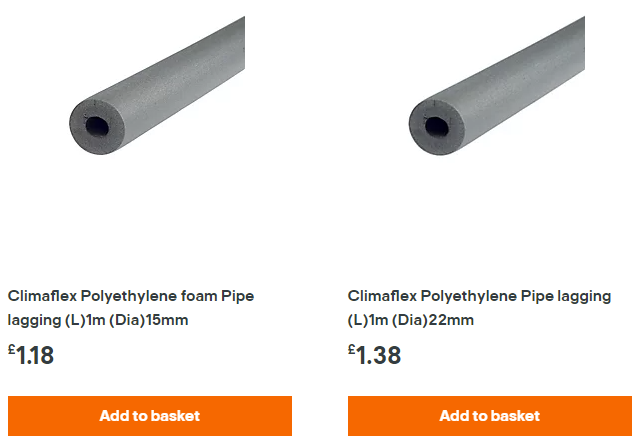
Lagging prices from B&Q website
A small digression here for those wondering what the ’15mm’ refers to when selecting lagging: Copper pipework in older installations will probably be sized in imperial measurements – 1/2 inch, 3/4 inch, 1 inch etc. An oddity of convention / historical development in the UK is that imperial tube measurements refer to the INNER diameter, whilst the metric tube measurement refer to the OUTER diameter – this means that imperial 1/2 inch tube (inner dia. 1/2″ = 12.7mm) is very nearly identical to the 15mm metric pipe. In fact these two sizes (1/2 inch imperial and 15mm metric) can generally be joined using a 15 mm to 15mm connector. The other imperial sizes do not have ‘workable’ equivalents metric sizes – joining these imperial to metric sized pipes require the use of adaptors specifically designed for the job (3/4 inch to 22mm, 1 inch to 28mm) – these adaptors are no more expensive than metric to metric connectors, they are just designed for the job.
Once the right sizes are purchased – installing is very simple: the lagging comes pre-cut along its length so it can be slipped on to a pipe, and the material is soft so can easily be cut to length with a sharp knife. It only took a short while of grubbing around under the floor to install from the cellar access.
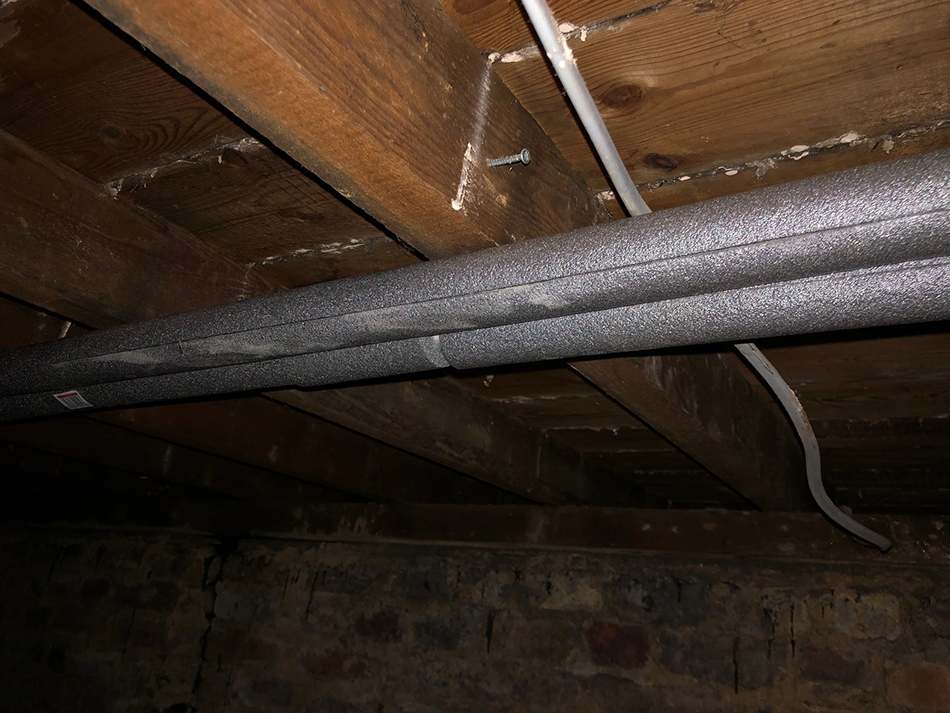
lagging fitted to central heating tubing under the floor
That was easy – but how much useful impact does it actually have? Let’s take a closer look below at some of the details, and I’ll share my conclusions.
Back to school
The heat loss calculations involved are well-established chemical engineering basics, taught in foundation / Year 1 courses all over the world. These are not new research concepts – in fact Fourier developed his ideas + theories on heat conduction almost 200 years ago. From Fourier’s Wikipedia entry:
I soon realised that after many years of non-technical work (emails, meetings, contracts etc) I’d forgotten how to construct any of these basic heat transfer calcs. I understood the principles well and had been reviewing thermal heat loss design reports for subsea deepwater production facilities in recent years, but couldn’t remember the equations. So back to school for me! My original uni notes couldn’t be found and I guess I threw them out last year during lockdown #1.. Still had some old textbooks on the shelf though – so dusted down and consulted them for a crash course in static heat loss through composite coaxial cylinders..
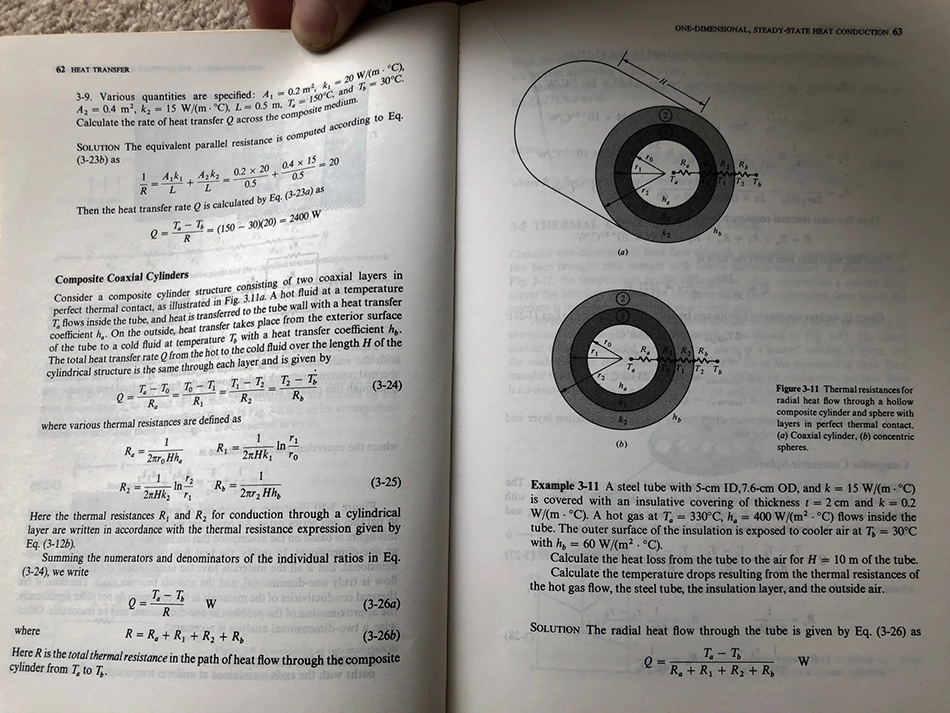
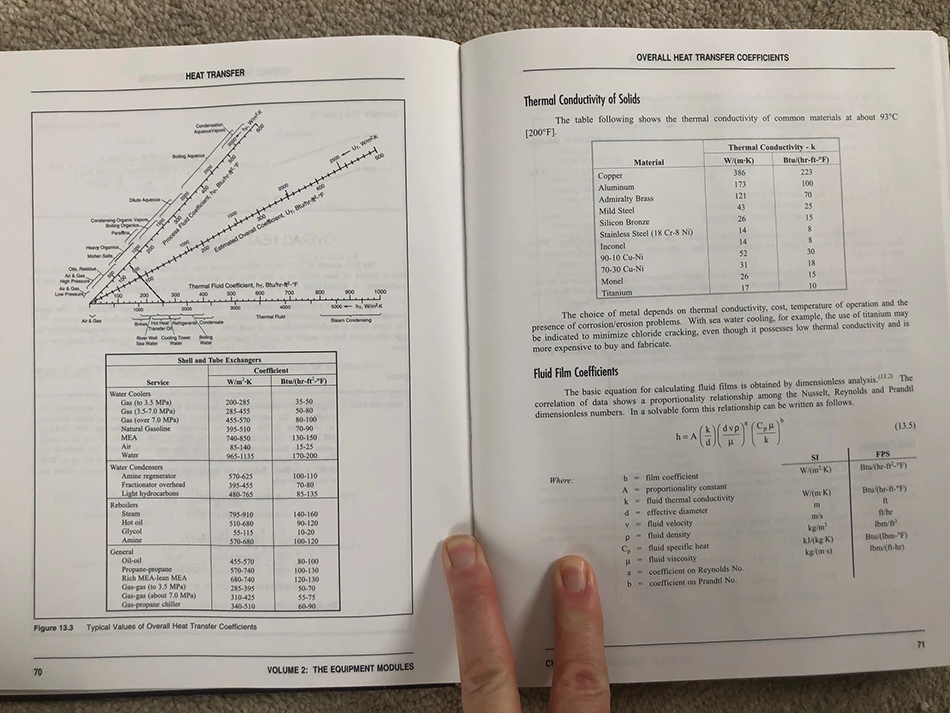
Heat Loss Impact Results
I wanted to be able to predict and compare the amount of heat lost from 1 metre of bare copper central heating tube (with hot water inside, and cold air on the outside), against the same copper tube insulated with the cheap polyethylene foam lagging from B&Q. The difference in heat loss between bare and insulated pipe should tell us how useful the insulation is. Assumptions made include:
- Tube length = 1m
- Tube inner diameter = 13mm
- Tube outer diameter = 15mm
- Tube thickness = 1mm
- Insulation inner diameter = 15mm
- Insulation outer diameter = 43mm
- Insulation thickness = 14mm
- Tube (copper) thermal conductivity = 386 W/mK
- Lagging (PE foam) thermal conductivity = 0.026 W/mK
- Inside (hot water) temperature = 65 deg.C
- Outside (cold air) temperature = 5 deg.C
- Internal (flowing hot water) heat transfer coefficient = 2000 W/m2.K
- External (slowly-moving cold air) heat transfer coefficient = 10 W/m2.
So 2 months later, the results are in:
- bare copper tube Overall U value = 9.7 W/m2.K
- bare copper tube heat loss = 28.1 W per metre length
- foam-insulated tube Overall U value = 0.001 W/m2.K
- foam-insulated tube heat loss = 7.56 W per metre length
- Heat loss saving from applying foam insulation = 20.6 W per metre length
That feels like quite a bit of heat loss? Does this make sense?
The caveat here of course is that all the coefficients used are approximate ‘best guesses’ and in reality are not known, that temperatures are steady – and that perfect insulation cover and clean internal surfaces are assumed. In reality, local temperatures and internal water flows / air currents are unknown (and change), there are bare spots in the insulation around the tube joints / clamps, and fouling inside the copper tube may provide a degree of insulation – so these kinds of calculation results should always be treated as a guide rather than gospel truth. The heat loss calculation is particularly sensitive to the air-side heat convective heat transfer coefficient which isn’t known with any certainty.
As a sense-check, some online plumber’s forums I found discuss that the heat loss from bare copper central heating tube can be expected to be in the range 25 – 45 W/ metre length – and should be a minimum of ~8 W/m if properly insulated, according to various industry and CIBSE guidelines / calculators.
[I must admit here that I actually re-calibrated my original guesses for heat transfer coefficients to fall within these industry expectations].
To conclude the heat loss impact: Part of our underfloor area turned out to be inaccessible from the cellar (floorboards would need to be lifted) – and so I wasn’t able to insulate all of the tubing. Let’s say I was able to insulate 8m metres (4m each flow + return lines for a single radiator) section, which would give a winter benefit for insulation of around 20 W/m x 8 = 160W.
It can also be expected that in summer, with a reduced set flow temperature (say 55 deg.C) and higher ambient underfloor temperature (say 16 deg.C), the reduced summer benefit for insulation is around 13 W/m x 8 = 104W.
Economics Results
Here the sums get even more uncertain / dodgy – but at least we have a basis on which to have a go.. Let’s work with the following assumptions:
- Max (winter) benefit from insulation = 160W
- Min (summer) benefit from insulation = 104W
- Cost of 8 x metres 15mm lagging = £9.44
- Cost of gas = 3.25p/kWh (Super Green Octopus tariff)
- Assume our condensing boiler has an efficiency of 90%
- Let’s say that central heating flows for 7 hours a day in the winter and 4 hours a day in the summer
Based on the above, let’s simplify and say that over the course of the year, the benefit of the insulation is an average of 132W (0.132kW), which is applied over an average of ~2000 hours. This gives a heat saving of 0.132 kW x 2000 hrs = 264 kWh/yr
Considering the boiler efficiency, this 8m of lagging applied is equivalent to 293 kWh/yr of gas supplied – which @3.25p/kWh has a cost of £9.52 per year
The cost of 8m of lagging (£9.44) is roughly equivalent to the annual gas cost savings (£9.52) associated with the 8m of lagging – so it can be concluded that the payback of underfloor insulation on bare copper heating tubes is around 1 year.
Over a 20-year timeframe, the (undiscounted) gas savings amount to £190!
As an important side note – burning natural gas releases ~0.185kg of CO2 per kWh, so the annual 293 kWh of gas saved from a bit of insulation also saves 54kg of CO2.
Or >1 tonne CO2 over a 20-yar timeframe.
If anyone can help me to improve on these assumptions / economic conclusions – please let me know!
What Did I Learn?
This is a pretty trivial and academic example of what turned out to be a very practical, quick and cost effective heat loss upgrade – that turned out to have good economic return and decarbonisation impact. I am left wondering why I didn’t do this years ago!
This has much broader implications when considering that the exact same principles apply to weighing up the cost/ benefit analysis of much bigger-scale home efficiency upgrades. To me it illustrated a few things:
- Lagging bare copper heating tubes is a no-brainer! Other home efficiency upgrades may not be so clear cut though.
- Doing these kinds of calculations are not straightforward, even for qualified engineers. They may be beyond the grasp of non-technical folks, but for engineers that have forgotten these basics they should be re-learnable.
- This is not new technology, and the equations, calculation routines and best practices for home insulation are well established. In fact they are embedded in all modern residential building design codes and regulations.
- There may be some ‘low-hanging fruit’ type opportunities around old houses to cut down on heat losses / costs and emissions just by thinking about the problem.
These all fit with our theme that often the best impact in decarbonisation is from those actions that can be taken now based on well-established principles, rather than shiny new technologies.
Next Steps
I failed to get very far with my original mini-mission of getting quotes for the underfloor insulation. This was partly because we struggled to get contractors to come round to quote, and partly because I realised that part of the underfloor space was inaccessible without lifting the floorboards.. Since then, the Green Homes Grant (that I was planning to use to part-fund some of these upgrades) got abolished last week, and now winter is leaving us again the focus on keeping warm is disappearing for another season..
For draughty 100-year-old old houses, wholesale upgrade of insulation in walls, windows, doors and floors is a tough prospect that comes with a hefty price tag. It is still something that we plan to pursue though, and my remaining ‘home efficiency project’ remains doing similar analysis on:
- Underfloor Insulation: Insulating under the draughty floor space is probably the easiest / highest impact efficiency job we can do next. Will need to cast the net a bit wider to find contractors to come and quote (may have more luck with this over the summer months when less demand for this kind of service).
- Secondary Glazing: This probably makes good sense if we can find cost-effective supplier for units that work with our sash windows, i.e. bespoke measurements and vertically-split. Will prob. be quite costly to cover 2 floors of original single-pane sash windows. It should have a decent impact though and reasonable benefit for the cost.
- Wall Insulation: This is the big one. With single-brick wall construction, the external walls have poor thermal insulation properties and no prospect of cavity insulation. At least our house is mid-terrace so we really only need to worry about front + back. From what I’ve read so far, this job should ideally be done with internal (rather than external) insulation – which is hugely disruptive and requires redecoration. Cost >£20,000?
- What to do with the Boiler: This will be a hard call to make. Boilers work well and gas is cheap, and if we can get the thermal efficiency of the house under control through the measures above, then the result of that will be reduced gas usage and cost / CO2. We do need to move the boiler anyway at some point as part of kitchen extension, which could be a good opportunity to look at switching to heat pump for supplying hot water. Although heat pumps are a highly efficient use of power, power itself is a lot more expensive per kWh than gas and heat pumps also have a high price tag (£10-15k installed?).
So lots to think about in preparation for next winter. I would like to use a thermal imaging camera to check for cold / draughty spots around the house. I’ve used these offshore in the past for process troubleshooting around heat exchangers, and Octopus Energy offer the use of thermal imaging cameras for free.
Finally, I’ve been wondering about how the complicated, murky and well-regulated world of residential and commercial building energy certification could / should fit with what we’re doing. Some of this includes:
- ESOS (Energy Savings Opportunity Scheme)
- Trustmark, The Energy Company Obligation (ECO) and PAS 2035 (Retrofitting Dwellings for Improved Energy Efficiency)
- ISO 50001 (Energy Management)
I don’t think this is a direction that our business particularly wants to head in, but a better awareness would benefit us – and maybe there’s a link we can make in future with another organisation already skilled & qualified in this area.


